Read novels at the speed of sound with SubPlz and ttu-whispersync
Visual Novels are great for learning japanese, they have voiced lines, supporting background images (great for people like me who have aphantasia, or to cement the description), while offering generally “richer” vocabulary (口語 vs 文語) than anime/manga. Wouldn’t it be nice if we could have supporting audio for more traditional novels as well?
As you probably guessed, yes, we now can, thanks to the excellent work of KanjiEater with SubPlz and Renji-XD with ttu-whispersync. It will bring you a lot of the benefits of visual novels without many of the drawbacks and qualms people might have with them. The big plus side is that nowadays, a lot of popular anime draw their source material from Light Novels, and often, you’ll find that the narrator of the audiobook is one of the voice actors from the anime (The highest budget ones sometimes even have an ensemble cast, with different actors voicing multiple chracters, or use of SFX)! And of course, it goes without saying, but this method works for more traditional novels, there’s even some translated english books that got Japanese audiobooks counterparts. It works for anything that the market decided should have an audiobook (which, sometimes might surprise you in one way or another, it’s possible that that one specific very niche anime you like has an audiobook for its novels, while something like Re:Zero, one of the biggest sellers of a generation, does not).
Concretely, SubPlz automagically creates very accurate subtitles of a novel to its audiobook. It creates a subtitle file that you can use with the audio file in a video player, much like subbed anime/movies. As the time of writing the original article, most people use mpv and keyboard shortcuts (to go from one sub to the other) as well as extensions to use a clipboard page with it for lookups. For all intents and purposes it’s good enough to read as is, but it comes with certain drawbacks that ttu-whispersync fixes (lack of images would be the most obvious one).
So, what does it look like in practice?
Cool huh? It’s become my prefered way to read books when possible, it can force a slower pace on you (by following the speech) if you’re prone to whitenoising, saves you time second guessing yourself and yomitan-ing a word just for its reading, gives you non-verbal cues about what’s going on (emotion in the voice, knowing which character is speaking) and it breaks the monotony of scrolling while reading a book or just listening to the audiobook on autoplay. It can be considered a crutch in some senses but it’s not really detrimental to learning in the long run.
From Audiobook to Subtitle
I will not cover how to source the novel and audiobooks here, and will start on the assumption that you have an epub and m4b, m4a or mp3 file.
It’s possible to run the process locally, but for brevity and accessibility’s sake we’ll be walking through how to do it online. Feel free to use this as a reference to run it offline if you’d like however.
First, we need to upload our files to Google Drive, both audio and epub file being in the same folder.
I try to keep a folder structure like this:
Drive
	- subplz
		- book1
		  - book1.epub
		  - book1.m4b
		- book2
		  - book2.epub
		  - book2.m4b
		...

Note
You don’t NEED to name everything the same, but old versions did need you to do that and it’s pretty good mojo, feel free to do as you please however as long as you keep the folder structure itself.
For audiobooks split in parts or too long to work correctly, please see below
I heavily recommend reading through the instructions once or twice before starting anything. There is a video at the end illustrating the process as well.
First, let’s head here, and only the first time, File -> Create a copy in drive, then use the tab that opened (should be named Copy of...). From then on you can head to https://colab.research.google.com/ and open it again from the recent list.
- Click
Edit -> Clear All Outputsto freshen up the view - Click on connect in the top right (T4 should appear next to it afterwards)
- Click on the 2 first cells’ “play button” and wait for both to finish (green mark). You’ll get a prompt to connect to google drive in the first one, accept to do so.
- Edit the directory to match the book folder
- Click the “play button” of the last cell and wait until you see something mentionning how it completed.
- Grab your
.srtsubtitle file from google drive. - Once you’re done, click
Runtime -> Disconnect and delete runtime. This is important because there’s limits on how much time you can use google’s machines at once, so disconnecting as soon as you’re done is a good way to maximize your time if you have multiple books you want to do spread over a couple days.
Warning
Make sure to check on the tab once in a while to not get kicked for being idle.
Tip
-
Every time you start a new session you’ll have to redo the first two cells as well, but if you have a currently running runtime you can just restart the third cell over and over until you disconnect.
-
You can use the folder icon on the left to have a view of the folders and make sure your paths are correct.
-
You might get an error looking something like
pip's dependency resolver does not currently take into account all the packages that are installed..., despite it being all red, this is not a problem for us so you can proceed safely. -
If your pc crashes or you disconnect from the internet, you can return to https://colab.research.google.com/ and you should be able to catch the running instance as it runs.
Here’s a sped up video of what the process should look like:
Respecting grouping
This step should no longer be important thanks to the new update courtesy of Gilfaro. But is left as is in case you’re having issues with the syncing.
I personally find the faster version of SubPlz a little aggressive in splitting sentences, often breaking a single sentence into several subtitles, which is not as bad on ttu-whispersync nowadays (especially with the merging subtitles function). But if you’re fine with the transcribing taking a little bit longer for the sake of having longer subtitles, here is the solution:
In the last cell of the collab (in your copy), replace !subplz sync -d "{directory}" --overwrite-cache --threads 4 --model tiny --language "{language} --respect-grouping --nlp"
with !subplz sync -d "{directory}" --overwrite-cache --threads 4 --model tiny --language "{language}" --respect-grouping --respect-grouping-count 15
Files split by chapters
If you have an audiobook as a set of mp3 files (coming from https://audiobook.jp for instance), you’ll need to merge them into one file.
On windows/Mac I recommend AudioBookConverter, make sure to make chapter names match the epub names if possible!
On Linux, m4b-tool is fast and very effective.
These tools also allow you to split the audiobook, in case it’s too long without matching chapters and crashes SubPlz (this never happened to me however even with 15hours audiobooks). If you have a splitted audio file like this, you’ll, as far as I understand, need to run SubPlz on split text files to create a few subtitles file. To convert a book to epub, see right below.
Converting to .txt
Sometimes, SubPlz conversion fails to match some text and doesn’t generate subtitles for it, as far as I know, when using ttu-whispersync it isn’t much of a problem as you can see the whole file in front of you, but if you’d like to try and improve the accuracy, or the file doesn’t transcribe at all, it might be worth trying to convert to a text file:
-
From Calibre, right click the epub(s) and convert (or bulk convert), from epub to txt
-
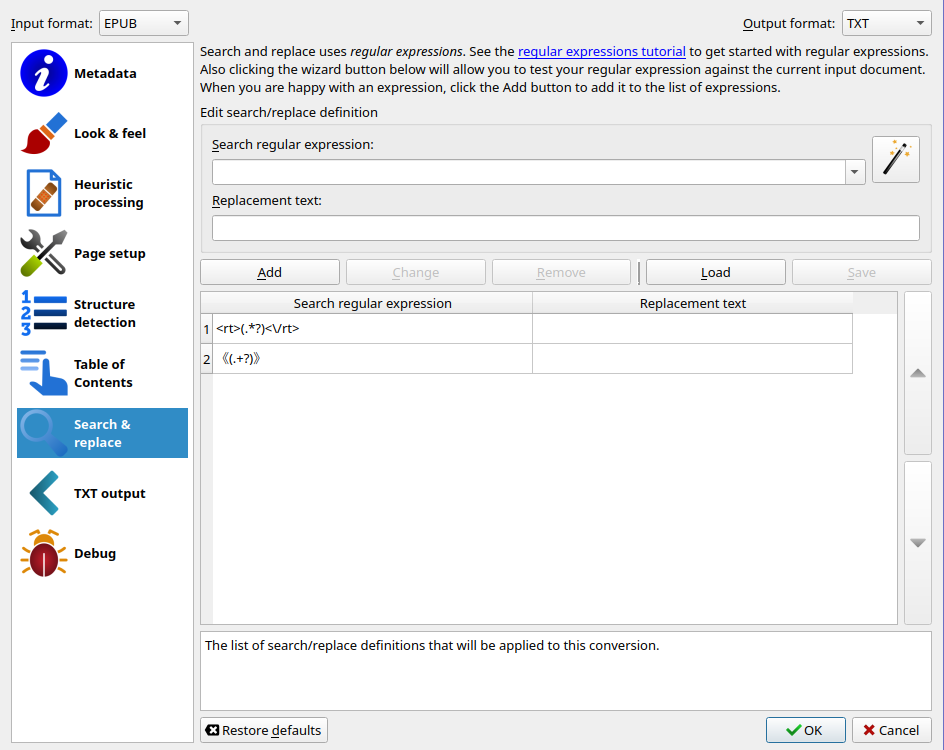
In search and replace, make it so
<rt>(.*?)<\/rt>is replaced to nothing《(.+?)》is replaced to nothing as well
This’ll make it so that no furigana is put in the .txt file
-
If done properly, it should look like this:
Note
You can save this configuration to a file, and load it later, to make it less cumbersome in the future.
- Open the text file (and view the epub in calibre), and make sure there is indeed no furigana, I do this once per series, because it’s very unlikely that if it works for vol1 it won’t for the suceeding volumes.
- Remove the bloat at the beginning and end of the text file, typically at the top, I keep the title and first chapter name, removing the ToC and publisher info. At the bottom, I delete everything after the あとがき (I also delete it if it’s not present in the audiobook, sometimes it isn’t, sometimes it is). Of course, split the text file into multiple text files if you split the audiobook because it’s too long, matching the start/end text of them.
Installing ttu-whispersync
Keep the github page in mind, it’ll cover things I won’t cover here, and has a useful FAQ section.
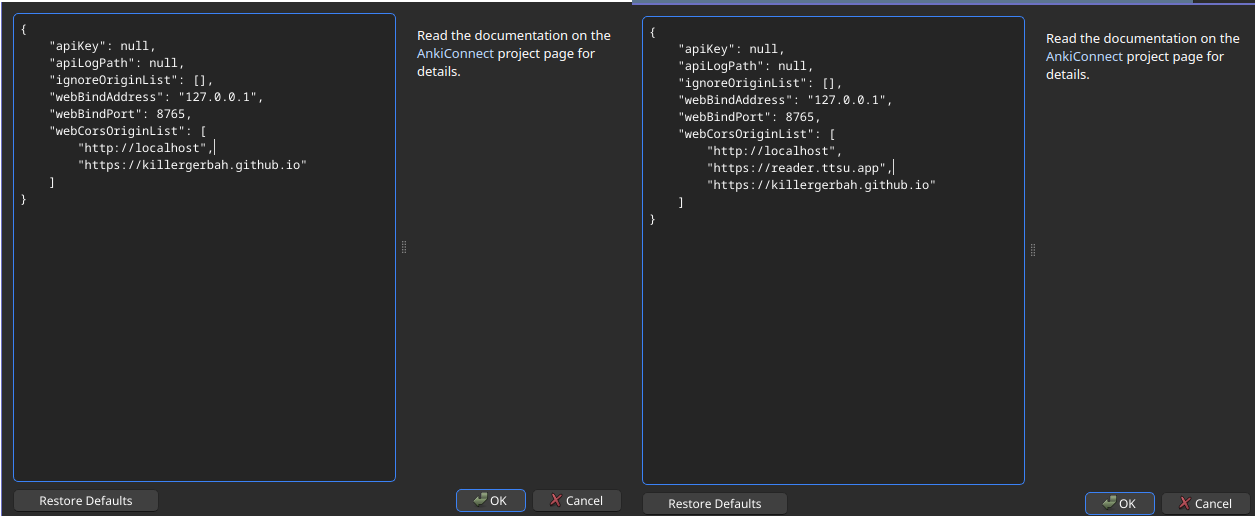
I’ll assume you have Anki and AnkiConnect installed, as well as have used ttu reader in the past. for step 3, in anki, click on Tools -> Add Ons, then select AnkiConnect then Config. add "https://reader.ttsu.app", between the brackets after webCorsOriginList then press Ok.
Install ViolentMonkey for your browser then install the userscript here
Warning
If you have another extension for userscripts (like TamperMonkey), it might work, but for compatibility’s sake I recommend using ViolentMonkey either way. On my testing the superior ffmpeg backend for recording didn’t work, for instance.
Tip
There’s also a chrome extension but ViolentMonkey is generally a better choice (updates, more browsers compatible, etc).
Head to ttu and open the book you want. If things installed correctly, you should see a little icon in the bottom left. Then it’s pretty straightforward:
- Click the image, to upload the audio file.
- Click below, to upload the subtitle.
- You’ll see a new tab
Matchin the side menu, click it thenmatchthenSave and Reload Page.
After a short, pretty well documented trip in the settings, you should be set to go! I recommend setting the Audio processor to FFMPEG if possible.
Tip: No highlight
If you’ve watched the video, I personally prefer using a system where the current subtitle is dark colored and the rest of the text is lighter, I prefer this over highlighting text as it is by default.
Doing it is fairly easy, in ttu options (not whispersync’s), press + then copy the theme you normally use (hover over the choices before pressing + to see the names), and lower the alpha of font to your liking (bottom right has a preview), then set the same color (copy the hexadecimal value, eg #BF4040) in whispersync settings -> reader -> line text color and voila!.
BONUS: From Subtitle to SRS
This is only tangentially related to the topic at hand but it made more sense in the original version of the article so bear with me. ttu-whispersync reduced the need for them (by allowing us to mine audio) but if you like to keep a sentence bank for whatever reason you might want to do that either way, which is why this section is still here.
We can also transform our subtitle into an anki deck. We already could have done that with subs2srs this has a couple drawbacks. Firstly, I modify the subtitles slightly for them to be generally more accurate, secondly, this way is several times (approximately 10 to 50 times) faster than subs2srs, thanks to optimizations from not needing the video to take a screenshot of, as audiobooks obviously don’t have video.
Running it is very simple, download it here:
Then extract and run audiobook2srs, give a unique name (otherwise your media collection might start having duplicates and trouble importing, I didn’t check this directly but better safe than sorry), select the .srt and .m4b, and set the audio offset (-100 is generally pretty good).
After a couple of minutes, you’ll get an .apkg file, which you can import in anki, tada!
Closing words
If you enjoy this way of reading, please consider supporting the people behind it, if only with show of appreciation, or spreading the word. Monetarily, you can access KanjiEater’s patreon here. Thanks for reading!